4.23.2012

Renting Underwater Photography Gear

I recently had a friend email me asking advice on where to rent an underwater housing for a DSLR. Since this is something I have often thought about using, I figured I would investigate. I first checked a local rental house and was unsuccessful. The next place I looked was a larger rental house, that had been around for quite a bit longer. So I expected them to have the housing since they have an expanded range of products available for rent.

What I found was a bit surprising. They didn't rent any specific underwater housing rigs either. Instead, they rented an underwater kit or 2 that would provide customers a lesser camera for a cheaper price.
In their defense, they had a great explanation as to why they don't invest into this kind of accessory.

"About twice a month we get a call asking us to carry underwater housings. This is a much bigger deal than people realize. Each SLR camera requires a specific housing, and each housing requires several lens covers, all of which become immediately useless in two years when that model is replaces. When we do the numbers , we'd end up charging about a third of the purchase price for a rental."

Here is the scary part:

"More importantly, underwater housings have a very real failure rate, and when they fail, the camera inside is toast... no repair possible. Logic tells us that if you can afford to ruin your camera, you can afford to buy an underwater housing. So for those of us who can't we've provided in the DX-2G kit."


DX-2G 12MP @ $140

What a fantastic business decision! They took the smart way out, yet still provided the customer with a solution. The rate for the model mentioned was about $140 for 2 weeks. Far less than the specific housing I finally found for the camera my friend asked about which was $660 for the same amount of time, not including the underwater housing required for the specific lens that would be used. At that price for 2 weeks, I would almost rather bite the bullet, and spend the $2,000 on a kit in case it was needed for further shoots.
I guess the big thing to consider here is that the "lesser" camera at the cheaper price in the first kit I mentioned is only a 12MP camera. While the more expensive kit will allow much more camera control and will bump the resolution up to 21MP. Now, you just have to ask yourself if that is worth the extra 500 or so dollars, and does the shoot require as large a resolution as possible?
Aquatech Camera Body Housing
possible 21MP @ $ 660
cost of lens housing not included.

Please visit the links below to take a closer look at the kits I mentioned above.
AquaTech DX5 Underwater housing for 5DMkII
Sea & Sea DX-2G Underwater kit

4.04.2012

Picking the right location

Occasionally there is a place I will see around town and immediately think to myself "I would love to do a photo shoot there." The problem is that most of the time these places are a bit eccentric and unique, requiring a subject with a very distinct look, an elaborate costume, or some creative makeup that links the subject to the location or is in high contrast to the feel of the location.


Sure, I will be the first to agree that these things will enhance the quality of a photo, I just lack the financial backing to pull off something of the sort at the moment. Luckily, every once in a while, schedules will line up and I will have the opportunity to make something happen without all the fancy production that can go into a shoot. So, I was pleased when a friend of mine contacted me and was interested in doing a shoot at one of these locations.  As it turned out, a location I came across several months ago, and remembered well, would work perfectly with the look of the model I was to shoot. After all, it doesn't really get any better than street art and pink hair.  


This is the first time I have had the chance to put to use some of the off camera flash techniques I have started learning from the fabulous Speedlighter's Handbook by Syl Arena. Some of the techniques that are touched upon are off camera flash using Master flash/slave flashes. For the majority of the photos here, I disabled my on camera flash so that it would only send a "pre-flash" to the slaves that were off camera, telling them what to do and triggering them so that they would be just strong enough to fill in some shadow areas that were being cast by the overpowering sun. In order to learn more, I highly recommend visiting the pixsylated blog, you are certain to come away with something helpful when it comes to shooting both on location or in the studio with Speedlights. 

3.22.2012

My Business Plan Evolution

Since originally posting about business plans and experts in the field, I have taken into account what I've learned and this has changed the way I want to communicate my business plan to investors.
One of the simple things that Tim Berry mentions in his blog is to review your business plan often, and keep it "fluid and flexible." I have found this advice extremely helpful, and since becoming a reader of his blog, I have changed some very important things in my plan.
With the business I plan to start being in the photography industry and serving professionals in that field, I feel that the operations section is one of the most important areas to communicate. The business is heavily centered around building loyal customer relationships and providing quality products to clients in a timely manner. So communicating  how this will be done efficiently and differentiate from competitors is essential to getting investors on board and securing start up capital.
Business Plan expert Tim Berry 
The Management and Organizational structure in the plan has also changed dramatically since reading the words of business plan experts. Originally the business staff was quite large, but after doing more research and making calculated assumptions, it was clear that daily operations could be handled by a much smaller group or employees.
"Knowing your numbers." is another thing Berry stresses. In my case this strongly relates to budgeting for employees labor and management salary. Needless to say, this is a section in the budget that will continue to change over time as the business grows and the commitment to clients and the quality service is in greater need.
Perhaps the most important advice that I have taken from researching experts in the field is another thing Berry mentioned in a recent blog that plays off of what I just noted.  "Your business plan is not a document, it's a plan." It is a living thing, that doesn't survive on paper but lives on your computer where it can evolve to better help your businesses future.

Referenced sources include :
http://timberry.bplans.com/2012/03/what-you-think-you-know-about-business-planning-can-hurt-your-business.html ; from Tim Berry's blog

http://articles.bplans.com/writing-a-business-plan/common-business-plan-mistakes/31 from Bplans.com

3.01.2012

Business Plan Development: From the Experts

Tim Berry
Recently while researching small business start ups I decided to look for some experts on business plan development. The first person I came across was Tim Berry, founder and chairman of Palo Alto software , and bplans.com. Tim has many ventures and has essentially dedicated his life to helping entrepreneurs plan for their businesses. He does this through his software, speaking engagements and his fantastically helpful blog.

As I read through Tim's blog, a post entitled 10 Tips for Starting a Service Business, really stood out to me. This is especially important because the photography business, in my opinion, is a service based business where you work very closely with clients. Among the helpful tips Tim provides are

  •  Understand that your first client is twice as hard to get as your second. 
  • Customer service is essential, so don't ever lose a client. 
  • Know your numbers. (The difference between sales and money in the bank) 
I like this blog because Tim provides important business plan advice in a way that anyone can understand. One of the other outstanding things about Tim's blog is that you can send him specific questions about your business here, in his "Ask Me" section. 

Daymond John
Another business plan expert I came across who interested me was Daymond John. He is the founder of the FUBU clothing company, turned angel investor who can be seen on the Shark Tank television series. I found a few posts highlighting some of his insight through another blog by Kristoffer Howes. In the blog I am referencing here, Howes mentions how John stresses the importance of knowing your competition, and gaining insight on your industry and marketplace through in depth research. John says to "do your homework" and learn everything you possibly can about the consumers and competitors that surround your business. He continues, saying that it is also important to include a detailed description of your business, including your products and services, as well as your teams talents and professional abilities that relate to the business. 

2.15.2012

Posing Techniques by Billy Pegram: Book Review

In Posing Techniques for Photographing Model Portfolios, author Billy Pegram caters to photographers who are looking to make their pictures better outside of the usual aspects of in-camera settings and lighting configurations.
Let me start off by saying, as a mid-level photographer I found this to be one of the more helpful books on posing techniques that I've had the opportunity to read. This is especially important because posing techniques are often overlooked as new photographers can become preoccupied with camera settings and positioning subjects (in reference to light) or lights accordingly.  This results in neglect of the model's pose, and forgetting about giving them feedback on what would work better towards achieving the desired outcome. Now take into account that many who are new to photography won't be working with experienced models. Now you begin to see a real need for a book like this. Pegram's structure of the book is easy to follow as he provides clear examples of the different variables that make up each posing technique. The result is an interesting and extremely educational experience.

There are also several posing techniques explained that can help more experienced photographers as well. I have seen some of the posing mistakes mentioned, committed by photographers whose work I follow and admire greatly. Obviously you will have to buy the book to get the full details, but I'd like to share some of the areas of the book I found most helpful.

Key points covered include :
  • changing small elements per shot. (no dramatic posing changes.) 
  • creating flow and directing the eye, yet stopping the gaze of the viewer.
  • 3 Rules of posing: taking into account the spine shape, shoulder level, and hip position 
  • paying close attention to the position of feet, hands, fingers, and proper bending of the wrists. 
  • lip placement and helping nervous models by using a few tricks and providing plenty of positive feedback

The elements mentioned which are covered in Posing Techniques might seem minute when thinking about them alone, but when the variables are combined, the difference they make can change the entire dynamic of a photograph. Pegram provides plenty of great examples to make sure these points come across clearly as pictured examples make up a good portion of the book. This is in no way a negative mark on the title, but the main reason I recommend it. [If for no other reason than the value of the second read being just as helpful as the first.]  Posing Techniques is an asset every photographer will want to have on their bookshelf to revisit when examining photos and critiquing their own posing techniques when practicing with models. 

Take a look inside Posing Techniques and other great photography books by clicking on the links below, and remember to check back soon for more reviews on books I've found helpful. 


2.02.2012

Location portraits with the Westcott 6 in 1 Illuminator

As a new photographer it is easy to forget about the basic elements of lighting a portrait on location. There are already several things to consider, and many new photographers get caught up in their camera with getting the proper exposure or focus instead of also taking light quality into account. This added attention one should give to the quality of light is what I believe hurts many new photographers.
I am referring to the quality of light falling onto your subject. This includes the direction of light in relation to your subject or whether they are in direct sunlight or a shaded area.

These factors can be used to your advantage, but are often overlooked by new photographers when at a location filled with distractions. They are also extremely important to understand before moving onto adding a flash for fill, or in an attempt to over power existing light with flash. As you can imagine these things just add to the variables and make the balancing act of a photographer even more difficult.

So let's start from scratch with just our camera, the subject, and our light source. In the picture below I wanted my subject backlit by the setting sun as it came through the trees of the park. This seemed like an obvious choice since my only other option was to face him in the opposite direction facing the sun. This would result in a "squinty" unnatural look from the direct sun in his eyes. Not to mention an unhappy model.

Richard Ducat is the drummer for the progressive metal band NACIREMA.
 Click on the picture above for more information . 
I then told Rich to angle his body towards me. Now, rather than having him completely backlit by the sun, it is wrapping around his face and onto his nose. By doing this I was using the sun as a backlight and what is referred to as a "kicker."

Now I brought in another light source. The rest of the light was still provided by the sun, yet redirected by a reflector or "bounce". I use the Westcott Illuminator 6 in 1. This is a priceless piece of gear that I always carry with me on location. Reflectors require virtually no set up time. Great results can be as easy as directing an assistant where to stand while holding it at the appropriate angle. In this case we used it as a fill to avoid a lot of shadows on the left side of the photograph (the right side of his face). It also provided a unique catch light and lessened the shadows under the eyes and chin. You can see this catch light at the 8 o' clock position in the subject's eyes. 

So don't make things more difficult than they already are, and don't underestimate the value of a reflector. There are many other uses for reflector kits like the Westcott Illuminator. With this kit you have the option of 2 diffusers to soften the light falling onto a subject. It also includes 3 covers for reflective surfaces, as well as a black surface that can be used as a flag to block light. You can learn more and order the 52" Westcott Illuminator kit at B&H Photo. 

1.25.2012

Blockposters; An interesting medium

I've always been interested in photography outside of the digital medium. In my opinion, there is something special about a print. Whether hanging on the wall of a gallery, or the door of a dorm room, there seems to be something a bit more personal about analyzing the art of a photograph when it is actually in front of you and not backlit on a monitor. So, since watching the street art documentary "Exit Through the Gift Shop" over the holidays, I've had a growing itch to find an interesting tool that will allow me to display my photos outside of the digital medium. How ironic that I found that tool online.

While scanning through some photography websites and blogs I came across a site called blockposters.com. The site allows users to upload a picture of their choice and then breaks the picture ip into several large page sized pieces. The pages, now in pdf form, act as puzzle pieces when printed out and fit together to form a much larger poster sized image.  I used a picture from the previous post for comparison.

The website gives the option of printing landscape or portrait, as well as the number or desired rows and columns.
Now all I had to do was print the pdf file generated by the site and trim the edges.

Important note: I chose to shrink the images to fit within the print margins for fear that the pictures would not print properly. This resulted in me having to trim a good amount of white edge around each of the pieces. Next time I will take a chance and forego the "shrink to fit" option when printing.

Although I found this to be an excellent and unique way to display photography there can be some cons to the process. One of the biggest things I found less than perfect about the process was that the maximum file upload is 1MB. I initially thought this would kill the clarity of the end product,  but in the end it didn't seem to matter much at all. You can see for yourself in the image below as the pages cover the floor or my living room. The final dimensions of the printed and trimmed block poster were 5' 3" x 3' 6".
The 36  printed "blocks" of the poster as I trimmed their edges.

1.23.2012

Coloring with Totally Rad Photoshop Actions and Plugins

   Over the past months I have devoted a good amount of my free time to exploring photography styles and developing it into an art that I can call my own "style."  Along with a a recent studio lighting class, this is another of my efforts in an attempt to stand out from the entry level DSLR owners and growing population or photography hobbyists.
   I have adopted a method many artists use in developing their own style. I closely examine and deconstruct the work of other photographers, and incorporate things that I like with techniques I already know. This doesn't only apply to the shoot, but also to the way others go about post processing. So, my efforts led me to post processing and coloring. Ever since, I've been using tools like Rad Lab by the Totally Rad company to give my photos that "little something extra."

Here, I've colored some pictures I shot of a friend Amanda St. Pierre, a beautiful and extremely talented artist herself.
Check out Amanda's cover of Ingrid Michelson's Die Alone, and download it free from Soundcloud.


12.13.2011

Legal Issues for Photographers

Author Tad Crawford
     I recently listened to a few podcasts that touched on the subject of protecting yourself as a photographer. The first was a great conversation with author of the book Business and Legal Forms for Photographers, Tad Crawford. Of the many things that Tad mentioned in this extremely informative podcast, there were a few key points that I have recently learned about myself that I want to share with others.
     Tad hits on the fact that it is imperative to protect yourself with solid, well rounded contracts when you are doing freelance work. His book provides a checklist for making sure you cover key areas when in specific situations. The checklist can also be used as a tool when evaluating those contracts given to you by others. Contracts will protect you against future misunderstandings. Tad voiced concern about so many current photographers working on a "handshake agreement." "This is just a bad idea, verbal contracts just don't work because people simply don't remember." Written contracts can also help to salvage business relationships where individual parties might have honestly forgotten about specifics otherwise agreed upon in a verbal agreement. He also talks about copyrights and the usefulness of registering them with the government. Which is required before pursuing litigation, even for something as simple as an injunctive release. For more information on his book or to listen to the podcast yourself visit Camera Dojo's website.

11.29.2011

Paparazzi

     Living in Orlando with Disney and Universal Studios right down the road, I often hear about appearances by celebrities in the area.  This triggers a wonder about what it might be like to try and get a unique shot of whoever it might be by joining the paparazzi for an evening. So, when I heard about some actors from the Harry Potter franchise making a local appearance to promote the release of the final films DVD/Blu-ray I figured I might give it a shot. As I battled the crowd of teens and their parents I managed to get a few decent shots, and learned a lot about the atmosphere. In this situation it seems that the “spray and pray” method works best. This means to take lots and lots of shots and pray that a few of them might be worthy of the front page.

Actress Katie Leung (Cho Chang) 
     Just to clarify again, this was not the stereotypical paparazzo outing since it was an organized event. I have never really been interested in the type of gig that requires me to chase down my subject or wait for them outside of their favorite restaurant. Which seems a bit creepy and illegal. I do however understand that many people make a decent living off of such work. This idea however, recently got me thinking about the legality of the actions of these people who aggressively pursue their famous subjects and what actions have been taken in return, and how I can protect myself in business ventures that might involve these situations. So I looked up a few relevant cases, and this is what I found.

     In 2008 the website hollyscoop.com reported that actress Sienna Miller had gone to the London’s High Court to claim damages against the paparazzi for “ruining her life.” She stated that after several pleas to get them to stop she was continuously chased while driving, confronted at her home, harassed several times at an airport, and also while walking her dogs in her neighborhood.  As a result, the High Court found that the four month’s of harassment Miller endured was worth nearly $80,000 dollars in damages. This was in addition to $84,000 she made off of the paparazzi in the United Kingdom for a similar case.

Sienna Miller
image by WENN.com

   In the United States, the courts don’t seem to be as lenient on celebrities.  Troubled actress Lindsay Lohan sought a restraining order on paparazzi members after her rehabilitation clinic deemed it unsafe for her to be driving since the paparazzi were creating unsafe conditions for the actress. Her driving privileges were revoked after the clinic mentioned this to the Los Angeles County Probation Department who had earlier agreed to let Lohan back behind the wheel. 
     Although the purpose of a restraining order is to deter someone from a threatening act it was found difficult to place a blanket order over the entire paparazzi. The article from FindLaw.com’s celebrity justice blog also addresses the problem that these photographers are trying to do their job when capturing pictures of Lohan driving, in which case an order would interfere with their ability to make money.  This personally seems a bit reminiscent of the Princess Diana death investigation. Unfortunately it seems that this particular issue of paparazzi car chases will only be settled in retrospect of a future tragic event.

     There are also instances where the paparazzi have come out ahead in court. Though, in this case, not a harassment issue. Just last year MSNBC was sued by paparazzi members for the use of their photos without permission. Mavrix photo alleged copyright infringement against MSNBC for the unauthorized use of photos of actress Penelope Cruz. Find Law writer Laura Stachan wrote that the maximum fine for this infringement is $150,000, but since the images were used across a wide range of media the paparazzi could argue that there were many act of the infringement.     
     So, it seems that the paparazzi as well as celebrities are protected, to an extent as long as they are both following the laws that are already in place.

10.27.2011

Night Portraits Using Off Camera Flash

Since purchasing my Lastolite softbox a few weeks ago I have been researching the best way to put it to use while shooting with off camera flash and practicing techniques on balancing off camera flash exposure with existing ambient light. I decided a shoot involving night portraits would work best. 

EQUIPMENT 
It is important to first understand that when using off camera flash you will need some kind of wireless transmitter. I use the Pocket Wizard Flex TT5 transceiver on the flash end with the Canon 580EXii, and the Mini TT1 to transmit that signal from the camera. Pocket Wizard makes these for both Canon and Nikon brand cameras. As mentioned, I recently purchased a Lastolite softbox to increase the quality of the light from the flash. This will help get away from the hard light "paparazzi look" by making the light from your off camera flash softer by diffusing and increasing the size of your light source. 

LOCATION
The location I wanted, needed to provide some interesting lighting and different options for backgrounds. This really meant I wanted some good quality ambient light to balance with the off camera flash since, after all that is most important to interesting night portraits.  So as I searched the database of locations in my mind, I realized I had been to a place that fits this description perfectly.  It was Disney's Boardwalk hotel and resort that met my requirements. 


THE PROCESS
As the models, my assistant, and I arrived at the location the sun had almost completely set. This was of no concern to me since I didn't need it to accomplish my goal for the evening. Which by the way, was to get a hand full of quality shots to justify my purchase of the off camera flash and lastolite softbox.
Below you can see one of the shots that I felt worked best with what I was trying to achieve.  As Faith sits on a park bench she is backlit by the lights across the lake. These were underexposed by 2/3 of a stop and then my off camera flash was set to manual where I adjusted the exposure so that she would be properly exposed in order to set her apart from the background. The Lastolite softbox rig was set up to the right of the camera at a 45 degree angle. 
 © Andrew Prescott/Faith Smith
Luckily,  I was able to get a few more pleasing shots before being approached by resort security who asked if I had permission for a "professional photo shoot" on the premises. This immediately took my focus off of the pictures I was taking and the direction I was giving. Apparently all photos that are taken with an off camera flash or softbox are deemed professional. I explained that we were all students and that there was no money to be made from the photographs being taken. This would end up buying us a few more minutes before the next interaction including a similar complaint.
Although I was flattered that so many people thought I was a professional, I was also aggravated in realizing this wouldn't stop. By now, with the feeling I had achieved my goal, we were ready to appease security. So we left in time to catch the nights fireworks display.
A reverse angle from the first picture.
You can see the last bit of remaining sunlight create a
nice glow as it fades behind the buildings in the distance.
 © Andrew Prescott/Faith Smith
To avoid going into a long tangent about how I felt the needless pressure by Disney to leave that night and remain focus on the pictures themselves, I will just state my disappointment for being unable to make better use of the trip by getting more quality night portraits.

So, I will chalk it up to a lesson learned about the importance of finding information on rules and regulations of locations beforehand. Especially if you are going to use equipment like an off camera flash with a softbox. This will make you more efficient once you are on location, and will certainly help with the way you are viewed by the people you are working with. Thankfully, Faith, Amanda and Ryan were a pleasure to work with and all very understanding of the situation.

Please subscribe, leave comments, and feel free to ask any questions.

10.18.2011

Interview with Gore FX Founder Michael Gore

    As I continue to practice my personal photography and strive to gain more knowledge about the business behind it, opportunities to learn from those in similar freelance fields often present themselves. So with  Halloween quickly approaching, I found it only appropriate to incorporate a lesson from someone who practices haunts and horrors on a regular basis.  
     Today I had the chance to talk with Michael Gore, owner of Gore FX, a makeup and special effects company based in Orlando, FL.     
Michael works on a prop from the new independent horror feature Blood Widow.
      Michael and I sat down to discuss the importance of negotiation in freelance fields and the criteria he uses to make deals when he is offered a job. Although he has a rapidly growing resume he remains humble and admits that his decisions to take certain positions are still influenced by the status of those doing the offering. As with all freelancers, it certainly makes it easier to negotiate salary when the job is with a well known company who will not only provide a decent pay check, but networking opportunities and some great experience along the way. By working for employers of a higher status it validates his skills and helps him to better his position in deals with prospective employers who might be looking to take advantage of his talent. So contrary to the logic of those who aren't freelancers, jobs with these larger, more prestigious companies will sometimes be taken at a lower salary due to artists finding value in making a name for themselves among them.

9.14.2011

Why rent?

      With DSLR cameras getting more and more popular the gap between the casual and professional photographer seems to be getting smaller. As a result, it brings tons of new people into the photography profession every year, with most looking to find a niche and make a name for themselves within it. But this takes time, therefore many who are new to the business have to shoot a variety of pictures in order to make ends meet. They basically do what they have to do until they can do what they want to do, as many of us are familiar with. This could require a range of different jobs including weddings, sporting events, head shots,  maternity or model portraits, wildlife portraits, newborn portraits, or any form of macro photography. These are just some of the work opportunities that may be open to a new photographer that might not want to take a job, yet might have to in order to survive for the time being. But its not as easy as taking any job you want, there is another variable in the equation. The kind of job you take as a photographer directly relates to the kind of equipment you have. It is quite foreign to those outside of the business that there is specialized and expensive equipment that is involved in getting certain photos. The majority of this is based around the kind of lens needed to get a desired shot. The problem is that in most cases this would require someone to make a several thousand dollar investment in order to take the job. For example, take the photos below.

Photo left: by Paul Bertner
Photo right: Maxwell Rocha
 In order to create photos like this it would take an initial gear investment of $2,224. (for example the Canon 65mm  macro,  kenko extension tubes, focusing rails, and a Macro flash) All which can be found here at B&H photo.

9.01.2011

Investing in photography equipment

     For as long as I have been interested in professional photography, I have always had a hard time deciding what equipment to buy and when to purchase what. And in talking with aspiring photographers it seems that I am in no way alone in this dilemma. With photography being such a saturated market and with DSLR's becoming so popular, photography has never before been so competitive. So we who are serious about starting up and making a name for ourselves need to look for ways to set ourselves apart from the casual users who call themselves photographers and are really just camera owners or hobbyists. Other than the obvious skill and talent, I feel as though there is another way to help separate yourself from the field of casual camera owners. This is investing financially in your work as a photographer and the equipment you use everyday. Of course you need to know the basics of what you are doing before investing thousands of dollars in equipment. As it is important to understand the advantages and benefits of having higher quality gear, especially for those of us starting out who are on a budget and don't have a steady income from the photography at this point. Major companies like Canon and Nikon realize this and make products for all different price points. Take the below example of the Canon 50mm prime. 

The Canon 50mm prime lens options  (f1.8, f1.4, and f1.2)
     As you can see in the above image taken from B&H photo there are 3 different price points resulting in 3 different lens qualities. The most obvious  difference is the aperture settings. With the lowest priced lens at $119 only being able to open up to a f1.8, it still gives beginners and those who are just getting started or are on a strict budget the option to shoot at a rather wide aperture. But this lens is also something that isn't going to last forever. In keeping the price low and the optics as high quality as possible it seems that the actual body of the lens took the biggest hit at this price point. It is a made with a plastic body and has no real weight at only 4.6 ounces. In my opinion it is a clean lens but not anything a serious or even enthusiast would want to spend money on.

8.25.2011

Photographer Rick Smolan : The story of a girl

     Rick Smolan is one of the world's most famous photographers and has worked with TIME, Life and National Geographic magazines as well as creating the best selling One Day In The Life photography series. 
     In his recent TED talk , Rick tells the story of a an assignment through South Korea in 1978 where he was investigating the lost generation of illegitimate Amerasian children fathered by American soldiers for TIME magazine.  Afterwards,  he was so unhappy with the published product that he set out to tell a better story through his pictures on his own time. In hopes that he his photographs would actually have an effect on a situation, rather than just documenting one. 
     In the trip back to South Korea he would meet an Amerasian girl and her grandmother who agreed to let him tell her story through his pictures. What would eventually come is as great a story as could ever be written.  As Smolan inspires the audience in telling this first hand account he developes a personal connection with us as if including us in his journey over hurdles of changing a little girl’s life forever. It’s as if it were a script written in Hollywood when he describes the adversity encountered while trying to help her, yet he’s not making this up. He shares the pictures to prove it.  He goes on to tell how he used his professional skills and connections to help him though his mission that became much more than photography.

Photo by Rick Smolan, 1978

  Ricks personal journey is a reminder to me of why I got into the entertainment business in the first place. Not just to take pictures or make films, but to make a difference in the lives of others and impact them in a way that makes a personal connection in turn making the world a better place.

Listen to Rick tell his amazing story here. 
   

8.07.2011

A Professional Organization for Photographers

In the recent months since my graduation from film school I have started to network in order to meet new clientele for photography and find others to learn from and help me to build my portfolio. In this time I have also come to find, that there are a lot of people who call themselves “photographers” or even “professional photographers,” most of whom started because they own a DSLR. Many of these people know nothing about the business or little more than the basics of photography. So I wanted to look for ways to separate myself from the casual DSLR owners outside of the obvious quality in photographs. While reading a book by Norman Phillips on the legal aspects of the industry he mentioned a professional resource that helps to separate higher-level photographers from casual hobbyists.
The Professional Photographers of America is an organization that does just this.

          Among their several useful offerings is the knowledge they provide to others on copyright and the rights of the photographer, as well as helping us to educate clients or even helping photographers directly if they run into copyright disputes such as large companies using images out of agreement. 
One of the truly amazing aspects of the PPA is the wide array of educational benefits they offer. As I learned more about the organization I found that they offer online classes, host business oriented workshops on how to make your studio more profitable, and even unique peer to peer classes that are centered around a Monday in October that is referred to as Super Monday. This is where members in local areas can gather to learn from their peers through techniques as well as business related topics, all while networking with people who have the same interests.

          I particularly like that in whatever they provide they truly understand who their customers are. Although I am trying to separate myself from the casual hobbyists who call themselves pros, I am also NOT a big studio with tons of disposable time or income. The PPA caters to people like me. If they list an upcoming workshop that might be too in depth, or aimed more at large studios, they also make sure to have an option for the new and emerging studios. This will definitely help to make aspiring industry professionals like myself more successful long term. 
Overall I have been extremely impressed with all of the information they provide, and with it being all in one location it is exceptionally convenient. I cant wait to delve deeper into the rest of the organization outside of just the educational and networking opportunities. 

7.12.2011

Online Photo-sharing for Professionals

    For the past several years we have all seen photo sharing websites come and go, all of them with hopes of outshining the best known and most followed Flickr. Well, there is a new contender who might just have a chance. Just as Google+ gains momentum and begins to slowly take attention away from facebook, the site 500px.com looks to do the same in photo-sharing. Whether it's your day job or just a weekend hobby, if you are serious about photography you certainly want to give this site a look.  

all photos herein are property of registered users at 500px.com

    Among the several advantages of 500px, users now have the ability to display larger and higher quality images than on Flickr.  The site also allows the creation of stylish, professional looking displays where others can comment, like, and subscribe to your work. While this is scary for amateurs like myself, it is also very helpful to learn what others in the field think of your work. 

6.28.2011

The Future of Photography

How many times have you taken a "great" picture, only to review it and see that your focus was off. Or maybe you even realized this when taking the first shot. So you hurriedly reeled your subject back into focus, but by the time you were able to take another shot, the moment had passed and you missed the opportunity to capture a stunning image.
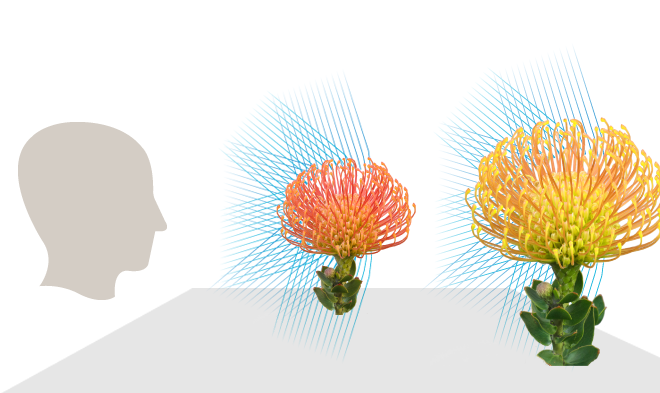
Well, have no fear! According to a small start up company called Lytro this problem is soon to be a thing of the past. With claims to have developed a technology that will let photographers take pictures now, and focus them later, they will revolutionize picture taking.

(Photo courtesy of Lytro)
The science behind the new "light field" camera technology is based upon just that. A light field is described by Lytro as the amount of light traveling in every direction through every point in space.
The new camera will capture the entire light field in a scene, not just a splice of the light field as conventional cameras have done in the past.
This technology will require a new sensor inside the camera appropriately named the"light field      sensor" as well as highly sophisticated software that will replace many other parts currently contained in
conventional cameras.
(Photo courtesy of Lytro)
I highly recommend checking out the gallery Lytro has provided for potential customers to experience just how the pictures will be customizable by editing the focus points in post processing.

Professional photographers should not worry, Lytro maintains that the camera is specifically made for consumers rather than professionals. Although they have yet to commit to a release date and specific price point, in a recent interview with the Huffington Post founder Ren Ng mentioned it would cost between $1 and $10,000.
Regardless of initial reactions or skepticism, I must admit that the thinking behind the idea is brilliant! For a company to push the limits of technology like so many are always talking about with a concept like this is abstract and mind blowing to even consider. Lytro might indeed be on it's way to providing the world with living pictures by "miniaturizing a roomful of cameras tethered to a supercomputer and making them fit into our pockets."

6.21.2011

Getting Started

The first set of the afternoon 
I'd like to start off with a recent shoot I did for a friend and local musician from the Orlando area, Michelle Elise. It took a few months to work our schedules out, but when we were finally able to plan a shoot I was pleased with the results. It only took a Saturday afternoon and a little bit of luck with the sun in the right place to get started. With some naturally diffused lighting coming through the palms overhead and a nice bounce off of the white marble patio everything fell into place.
Although the day went very smooth, I definitely found it difficult to express to Michelle how I wanted her to pose and when I actually got the shot I was looking for. I have found that with many inexperienced or even nervous or eager subjects, they will change a pose as soon as they hear the shutter "click." So it is important to let your models know that just because they hear the camera, they shouldn't change their pose. As the photographer might want to reframe the image, or capture the same look from another angle. Thus, it is essential that there be an open dialogue during the shoot. I also found it helpful to mirror or "imitate" poses myself for Michelle to copy. This is just easier to see than to explain to someone on how you would like for them to pose and helps to make the session more productive. Neil van Niekerk elaborates on this topic during his blog entitled "posing normal, everyday people for portraits."
I also used another one of Neil's tools for bouncing an on camera flash. I had assumed the majority of shooting would be done outdoors and was unprepared for indoor shooting as I didn't bring any supplemental lighting. The photo above was shot with